
Getting Started
- Requirements
- Installation & Setup
- Modelling Good Practices
- Toolbar Overview
- Manually Creating 4D Tasks
- Static Importing of 4D Tasks
- Dynamic Importing of 4D Tasks
- TaskTypes
- Linking 4D Tasks To SketchUp Entities
- Visualisation Modes
- Navigating trough date and time
- 4D Scenes
- Auto Generate PowerPoint
- Auto Generate 4D Movie
Requirements
Windows: XP, Vista, 7, 8
Sketchup: 8 or newer.
4d Virtual Builder’s requirements depend mostly on Sketchup’s requirements. For a complete list see: SketchUp Hardware and software requirements
Additionally, 4D Virtual Builder also requires the Microsoft Visual C++ 2010 Redistributable Package (x86) to be installed. If this is not installed on your machine, the 4D Virtual Builder installer will automatically install this package also.
Installation & Setup
Downloading and installing 4D Virtual Builder
- To download 4D Virtual Builder, fill in the download request form our downloads page.
- After downloading, unpack the zip and run the installer.
- If there are multiple versions of Sketchup installed, the installer asks for which version to install 4D Virtual Builder.
Registering your version
The first time that you use 4D Virtual Builder the software checks if it has been registered yet. If this is not the case, a registration window will pop up. After registration a 10 day trial period will start and you can use 4D Virtual Builder without any limitations. After the trial period has been expired, 4D Virtual Builder will enter ViewerMode. When using ViewerMode, no changes can be made to the 4D Virtual Builder project.
License settings
The ‘License Information’ tab in the ‘Application Settings’ window gives the ability to update and/or buy a license for 4D Virtual Builder. You can also find the remaining amount of trial days and your unique ‘Install Code’.
Localizations
From the ‘Localization’ tab in the ‘Application Settings’ window you can change 4D Virtual Builder’s language and also specify which day to use as the first day of the week.
Video tutorial
Modelling Good Practices
- All types of entities are supported to link with 4D Virtual Builder tasks: Edges, Faces, Groups, Components, Images, Sections, Guides, …
- Only top-level entities can be linked to 4D Virtual Builder tasks.
- Although any type of entity is supported, the usage of components and groups is preferred for performance reasons.
- significant speed gains can be achieved by using components for repetitive objects like beams, columns, … instead of groups.
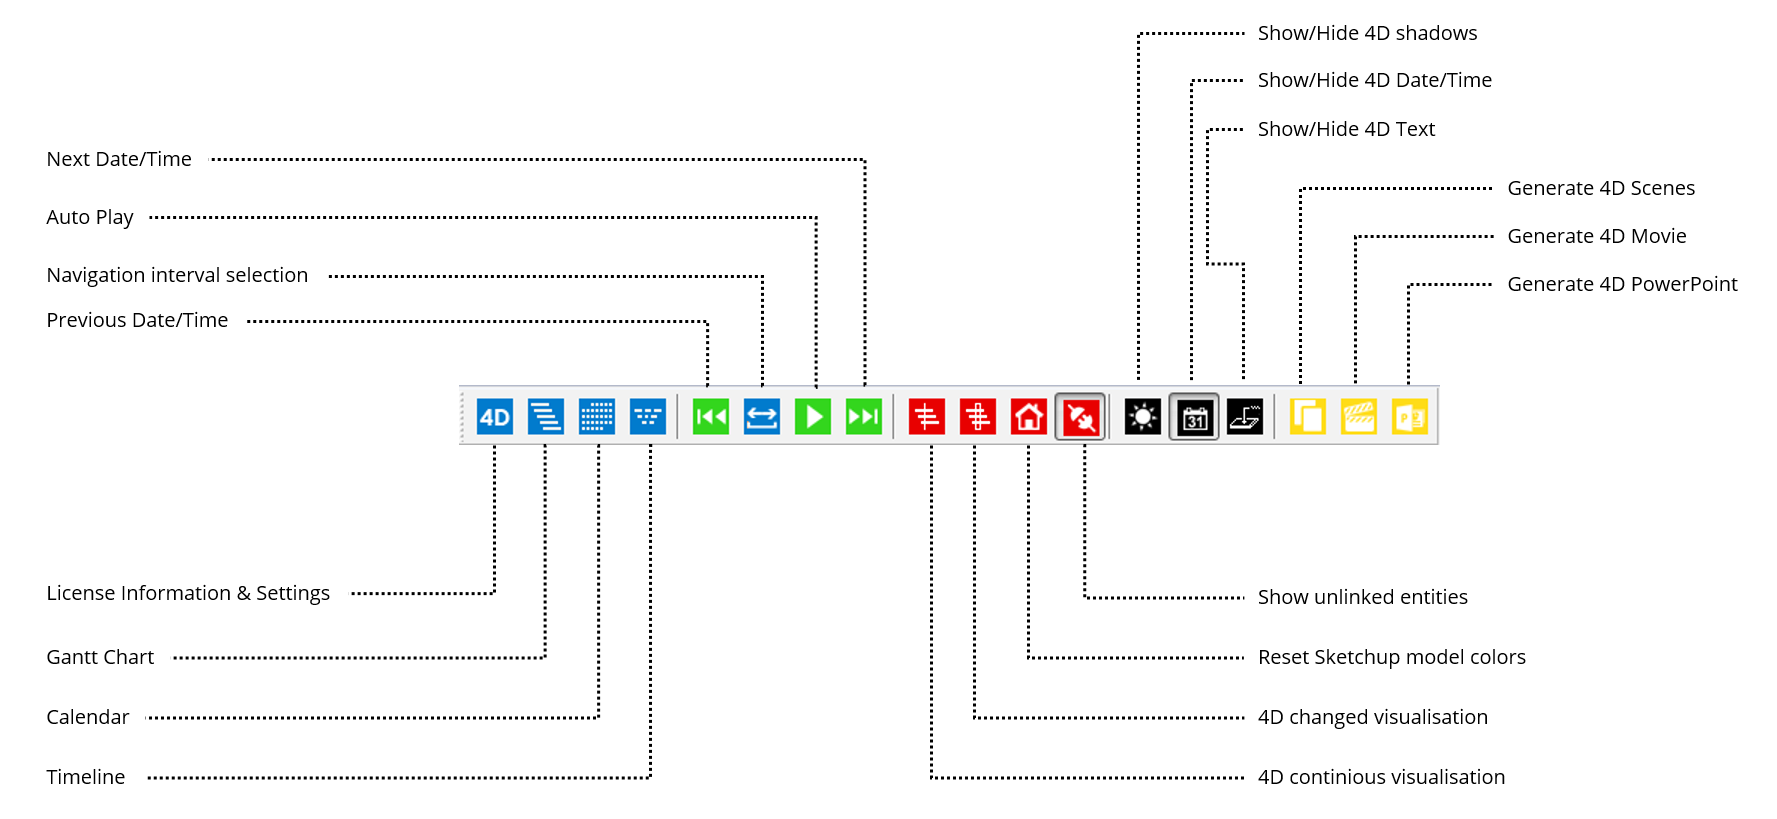
Toolbar Overview
Manually Creating 4D Tasks
Basic tasks and milestones
- Open the Gantt chart window by pressing the ‘gantt’ icon in the 4D Virtual Builder toolbar.
- In the ribbon, open the ‘Tasks and Milestones’ tab.
- To add a task, press the ‘Task’ button in the ‘Add’ panel. To add a milestone, press the ‘Milestone’ button in the ‘Add’ panel.
Automatically linked tasks: Multiple to Multiple
- Select all the Sketchup entities for which a new task has to be created.
- Open the Gantt chart window by pressing the ‘gantt’ icon in the 4D Virtual Builder toolbar.
- In the ribbon, open the ‘Tasks and Milestones’ tab.
- Expand the ‘Task’ button and select “Multiple to Multiple”. A new task will be created for and linked to every selected Sketchup entity
Automatically linked tasks: Multiple to Single
- Select all the Sketchup entities for which one new task has to be created, with all those entities linked to that single task.
- Open the Gantt chart window by pressing the ‘gantt’ icon in the 4D Virtual Builder toolbar.
- In the ribbon, open the ‘Tasks and Milestones’ tab.
- Expand the ‘Task’ button and select “Multiple to Single”. One new task will be created and linked to every selected Sketchup entity
Editing Tasks
All parameters of a task/milestone can be edited directly in the Gantt grid by double clicking on them. These parameters are:
- Title
- Start
- End
Additionally, tasks can also be resized and/or moved directly in the Gantt chart. The ‘Number of linked entities’ parameter gets automatically updated when a Sketchup entity is linked to or unlinked from a task.
Video tutorial
Static Importing of 4D Tasks
Supported Formats
- .xml Planning Files, exported by MS Project, Asta PowerProject, etc.
- .mpp MS Project Planning Files.
- .pp Asta PowerProject Planning Files
- .mdb Asta PowerProject Planning Files
Workflow
- Open the Gantt chart window by pressing the ‘gantt’ icon in the 4D Virtual Builder toolbar.
- In the ribbon, open the ‘Scheduling’ tab.
- Select the desired import format in the ‘Import’ panel.
- In the ‘open file dialog’, navigate to the file and press the ‘Open’ button
Dynamic Importing of 4D Tasks
Supported Software Packages
- MS Project
- Asta PowerProject
Workflow
- Open the Gantt chart window by pressing the ‘gantt’ icon in the 4D Virtual Builder toolbar.
- In the ribbon, goto the ‘linking’ panel in the ‘Scheduling’ tab.
- Select an already linked planning file in the drop-down selection box or link a new planning file by pressing the ‘new’ button.
- Depening on your version, you can link to .msp (MS PROJECT) files or .pp (ASTA POWERPROJECT) files.
- Once added at least one planning file, select it in the drop-down selection box.
- From now on, multiple functions are available:
- Delete: This function deletes the selected linked planning file. All tasks that were imported from this linked file will also be removed from 4D Virtual Builder.
- Search: With this function you can specify the file’s location if the file has been moved on your system.
- Open: This function automatically opens the native application (MS PROJECT or ASTA POWERPROJECT) and activates the project.
- Link – Entire Project: All tasks available in the selected linked planning file that do not exist in 4D Virtual Builder yet will be imported into 4D Virtual Builder.
- Link – Selection – Multiple to Multiple: All tasks that are selected in the native application and do not exist yet in 4D Virtual Builder will be imported into 4D Virtual Builder as top-level tasks.
- Link – Selection – Multiple to Single: All tasks that are selected in the native application will be combined into 1 4D Virtual Builder task.
- Update: All tasks that have been imported into 4D Virtual Builder will update to their state in the native application.
Video tutorial
TaskTypes
Description
TaskTypes are virtual objects that describe how Sketchup entities, linked to a task, should behave one a specific Date and Time. By default, 4D Virtual Builder is shipped with 6 TaskTypes:
- Construction
- Demolition
- Environment
- Logistics
- Finishing
- Groundworks
Every TaskType has a name and 4 PhaseStates:
- ‘PrePhaseState’ describes how linked entities should behave before the task to which they are linked is started.
- ‘ActivePhaseState’ describes how linked entities should behave after the task to which they are linked is started, but not finished.
- ‘PostPhaseState’ describes how linked entities should behave after the task has been finished.
- ‘ChangedPhaseState’ describes how linked entities should behave when a task has been changed in a specific interval that can be selected in the ‘TimeLine’ window. (only visible in ‘Changed Visualisation Mode’).
There are 3 possible values that can be applied to every PhaseState:
- ‘Hidden’: when this phase is active, all linked entities should be hidden.
- ‘Original Material’: when this phase is active, all linked entities should be visible with their original material applied.
- ‘Phase Material’: when this phase is active, all linked entities should be visible with the custom ‘PhaseMaterial’ applied.
Video tutorial
Linking SketchUp Entities to 4D Tasks
Linking from the Gantt window
- Select the Sketchup entities that should be linked to a task.
- In the Gantt window, select the task to which those entities should be linked
- In the ribbon, open the ‘Sketchup’ tab.
- In the ‘Linking’ panel there are 2 options to link the selected Sketchup entities to the selected task.
- ‘Link’: simply links the selected Sketchup entities to the selected task.
- ‘Link Only’: links the selected sketchup entities to the selected task, but, any other entities that are linked to the same task will be unlinked.
Linking from the Context menu
- Select the Sketchup entities that should be linked to a task.
- Right click on the selection and open the ’4D Virtual Builder 3.2′ sub-menu in the context menu
- In the ’4D Virtual Builder 3.2′ sub-menu, select ‘Link’ and specify to which task the selection should be linked.
Automatically linked tasks
See: Manually Creating 4D Tasks
Visualisation Modes
Continious 4D Visualisation Mode
Only entities that are linked to 4D Tasks are visible when using this visualisation mode. The way they are shown on screen depends on various variables:
- The project’s current DateTime
- The start- and enddate of the tasks they are linked to
- The used TaskType and the TaskType’s ‘PrePhaseState’, ‘ActivePhaseState’ and ‘PostPhaseState’. See ‘TaskTypes’ for more information on PhaseStates.
Changed 4D Visualisation Mode
Only entities that are linked to 4D Tasks are visible when using this visualisation mode. The way they are shown on screen depends on various variables:
- The project’s current DateTime and Previous DateTime. The Previous DateTime is calculated depending on the selected ‘Navigation Time Interval’ (see ‘Navigating trough date and time’), or the selected interval in the ‘TimeLine’ window.
- The start- and enddate of the tasks they are linked to
- The used TaskType and the TaskType’s ‘ChangedPhaseState’. See ‘TaskTypes’ for more information on PhaseStates.
Sketchup Default Visualisation Mode
Unlinked 4D Visualisation Mode
Video tutorial
Navigating trough date and time
Setup the Navigation Time Interval
4D Virtual Builder provides an option to customize the interval that is used for navigating trough date and time. By default, all the start- and enddates of all tasks and milestones are used as the navigation interval. This means that when navigating trough date and time, the next and previous date/time used is always a start- or enddate from a 4D task/milestone. In the ‘Navigation Interval Selection’ window you are free to toggle whether or not you want to use those project specific date/times:
- ‘Milestones’: include/exclude milestones from the navigation interval.
- ‘TaskStarts’: include/exclude all tasks’ startdates from the navigation interval.
- ‘TaskEnds’: include/exclude all tasks’ enddates from the navigation interval.
Other then those project specific date/times 4D Virtual Builder also gives you the option to include some specific ‘YearDates’ to the time navigation interval:
- ‘None’: do not include any ‘YearDate’.
- ‘Year’: January first of every year is added to the time navigation interval
- ‘HalfYear’: both January first and July first are added to the time navigation interval.
- ‘Quarter’: January first, April first, July first and October first are added to the time navigation interval.
- ‘Month’: the first day of every month is added to the time navigation interval.
- ‘TwoWeeks’: depending on which day has been specified as being the first day of the week (see Installation & Setup), the first and third occurence of that day for every month are added to the time navigation interval.
- ‘Week’: depending on which day has been specified as being the first day of the week (see Installation & Setup), every occurence of that day for every month are added to the time navigation interval.
- ‘Day’: every single day is added to the time navigation interval.
Simple Continious Navigation
Directly in the 4D Virtual Builder toolbar there are 2 buttons (Next and Previous) to provide an easy way of navigating trough date and time. The selected next or previous date/time depends on your setup for the Time Navigation Interval.
Auto Continious Navigation
Directly in the 4D Virtual Builder toolbar there is 1 button (Play) to provide an easy way of navigating forward trough date and time. This play function behaves the same as pressing the ‘Next’ button ever 2 seconds. To stop the function, just repress the ‘Play’ button.
Navigating to a specific Date/Time
4D Virtual Builder provides several ways to navigate to a specific date/time:
- When selecting a task in the Gantt chart, open the ‘Tasks and Milestones’ tab in the ribbon and press the ‘Start’ button in the ‘Visualise’ panel to navigate directly to the startdate of the selected task. When pressing the ‘End’ button, 4D Virtual Builder auto navigates to the enddate of the selected task
- When selecting a task in the Gantt chart, open the context menu by right-clicking the task. In this context menu you also have the possibility to navigate directly to the task’s start- or enddate.
- A calendar is also included in 4D Virtual Builder. To open the calendat, press the ‘Calendar’ button in the 4D Virtual Builder toolbar. When selecting a day in this calendar, 4D Virtual Builder auto navigates to this specific date.
- Number of active tasks
- Number of tasks started on that day
- Number of tasks ended on that day
- …
4D Scenes
Setup of the used interval
The interval that is used to create scenes is the same interval that is used to navigate trough date and time. See ‘Navigating trough date and time’ for more information on how to setup the Time Navigation Interval.
Creating and using the 4D Scenes
Pressing the ‘Generate 4D Scenes’ button in the 4D Virtual Builder toolbar will automatically generate 4D Scenes depending on the specific Time Navigation Interval that is currently used. Just like any regular Sketchup scenes, these scenes can be updated to store specific information about camera locations, shadow settings, … 4D Virtual Builder also stores Date/Time information in the scene so that when a specific scene is selected, the project’s Current Date/Time automatically gets updated to the scene’s date/time.
Video tutorial
Auto Generate PowerPoint
Requirements
To be able to use this function, Microsoft PowerPoint has to be installed on the same machine as 4D Virtual Builder.
Creating a template
Before using the Auto Generate PowerPoint function a template has to be created. A template is just a regular PowerPoint presentation containing only 1 slide. This slide can contain any object that powerpoint provides (images, textboxes, charts, ….). All images and textboxes on this slide can be used during the Auto Generate PowerPoint function to be replaced by 4D information.
Auto generating the PowerPoint presentation
When a basic template has been created, this template can now be used to auto generate a 4D PowerPoint presentation.
- Click the Generate 4D PowerPoint button in the 4D Virtual Builder toolbar.
- In the open file dialog, specify which template has to be used.
- A new dialog will open with an abstract representation of the template.
- Every image in the template can be interchanged with a 4D View and Visualisation Mode. (Only non 4D Scenes can be used as additional viewports)
- Every textbox in the template can be filled with the 4D Date/Time.
Video tutorial
Auto Generate 4D Movie
About
The 4D Movie generator acts the same as the default Sketchup animation exporter. The default Sketchup animation exporter however doesn’t use 4D information when exporting an animation from scenes. For this reason we’ve added our own 4D Movie Generator.
Just like regular animations, the 4D Movie Generator also uses scenes to generate an animation. Both 4D as non-4D scenes can be used, but only 4D scenes are able to change the project’s current date/time during the animation. For more information on 4D Scenes, see the 4D Scenes section. Scenes can also be excluded from the export, just like you can exclude scenes from the regular animation.
Generating a 4D Movie from 4D Scenes
- Click the ‘Generate 4D Movie’ button in the 4D Virtual Builder toolbar.
- In the opening gantt-like chart, each scene and transition between scenes gets represented as if they were regular tasks in a gantt chart.
- A custom duration can be specified for each scene ‘task’ and each transition ‘task’.
- To start rendering the animation press the ‘Render’ button.